How to Test your FICM
Tools needed:
Small 1/4 or 3/8" drive socket wrench, 8mm socket, 10mm socket and a pair of pliers. The FICM is located beneath the coolant reservoir bottle in the photos.
1. Start with a cool engine and truck.
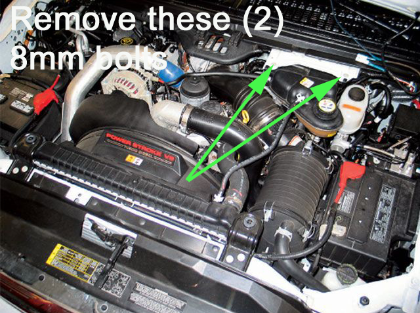
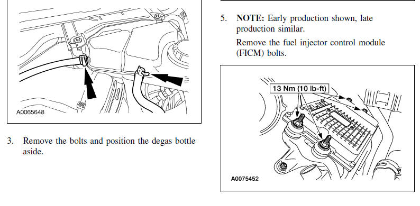
2. Remove and reposition the coolant reservoir. You can do this without draining the coolant as long as the reservoir is tilted to the right (driver's side). Remove these using the 8mm socket.
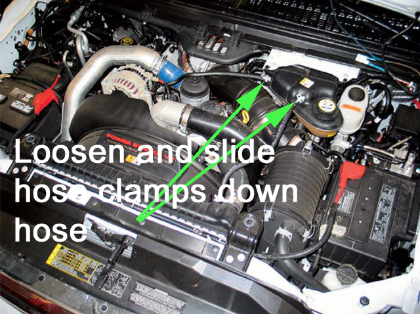
3. Slide the tank forward slightly and Loosen and slide the (2) hose clamps down the hose. Remove the hoses and Tilt the tank to the right while sliding it forward and out of the way of the FICM. There will be some pressure in the system and some coolant can spill from the hoses. Be CAREFUL with the large hose and "Y" pipe beneath the reservoir as this can easily be snapped. You can position the hoses upward or tie them up with zip ties to keep coolant loss to a minimum.
1. On top of the FICM is a small cover held on by two #20 Torx screws; remove these two screws and pry the cover off.
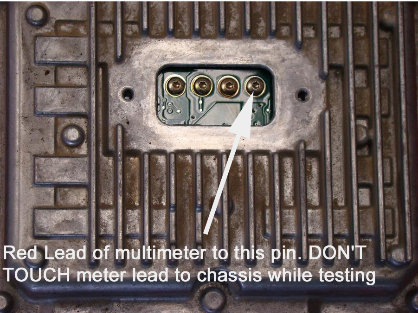
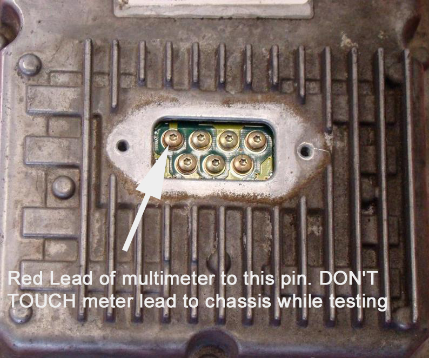
If your FICM Test Points looks like the photo above (4 Screw Model), start at step 3 otherwise, go to the second photo below then step 3 below that.
3. Take a multi-meter set on DC volts and connect the ground lead to battery negative, and with the key ON measure the voltage at the screw on your right—closest to the driver’s side fender. Do not let the probe of the meter touch the FICM housing or permanent damage will occur!
4. Have an assistant cycle the key and measure the voltage during the initial key-on buzz test. Voltage should not drop below 46 volts.
5. Next measure the voltage while cranking the engine. If voltage stays at or above 48 volts, the FICM is probably OKl. Abnormally low battery voltage can give a false low FICM voltage reading, so
make sure your batteries are good.
If the voltage is below 40-45 volts, your FICM is defective, if it is 25 to 35 volts, you have serious FICM problems.
1. On top of the FICM is a small cover held on by two #20 Torx screws; remove these two screws and pry the cover off.
If your FICM Test Points looks like the photo above (7 Screw Model), start at step 3 otherwise, go to the second 4 screw photo above, then start at step 3 there.
3. Take a multi-meter set on DC volts and connect the ground lead to battery negative, and with the key ON measure the voltage at the screw on your left—closest to the passenger’s side fender. Do not let the probe of the meter touch the FICM housing or permanent damage will occur!
4. Have an assistant cycle the key and measure the voltage during the initial key-on buzz test. Voltage should not drop below 46 volts.
5. Next measure the voltage while cranking the engine. If voltage stays at or above 48 volts, the FICM is probably OKl. Abnormally low battery voltage can give a false low FICM voltage reading, so
make sure your batteries are good.
If the voltage is below 40-45 volts, your FICM is defective, if it is 25 to 35 volts, you have serious FICM problems.
Removal of FICM
1. Remove the (4) bolts/nuts that secure the FICM to the truck. Some FICM's have (2) 8mm nuts in the back and (2) 10mm nuts in the front, some have all (4) that are 10mm.
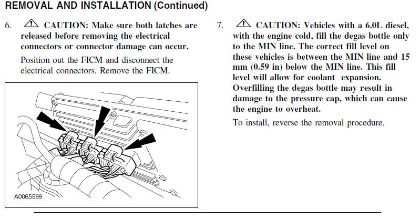
2. There are (3) connectors that attach the FICM electronics to your vehicle. Push each connector up slightly into the FICM to reduce pressure on the connectors and squeeze the (2) tabs on each and pull down (on the connector, NOT the wires). Each are firmly attached to the Module. When the connections are removed, it is now ready to be removed from the engine compartment. When re-installing the connectors, push in until you hear an audible "snap" indicating it is connected.


